BKMs for AGX5 Modular Development Kit Setup with OFS 2025.1
The following instructions are intended to enable users in using an Agilex 5 Modular Development Kit with the OFS 2025.1 release.
1.0 Host Machine Settings
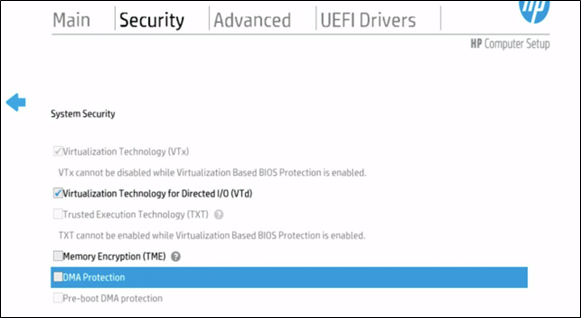
The following BIOS settings will need to be changed to support the Agilex 5 Modular Development Kit on an HP server running ILO 5+. The location of specific settings in the BIOS menu may change depending on the server manufacturer and BIOS revision.
- BIOS Setting: System Security.
1.a. Enable Virtualization Technology for Directed I/O (VTd)
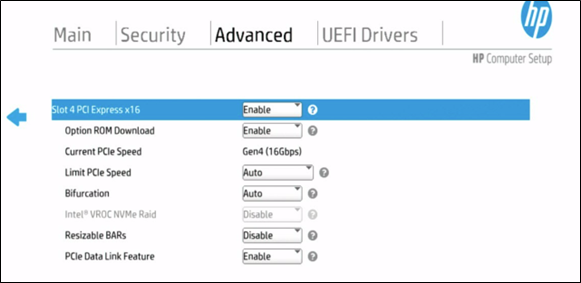
- BIOS Setting: PCIe Slot Setting (Everything default)
2.0 AGX5 E-Series Modular Development Kit Installation
2.1 Switch Settings
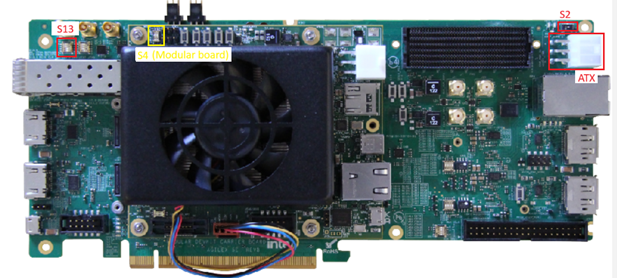
-
Enable the following switch settings for JTAG programming:
#### Table 1: SW for Jtag Programming
Switch Position Description S2 (carrier board) POS-1 POS-1 - for PCIe EF 12V input for system power, POS-3 - Enable ATX 12V input for system power S4.1 & S4.2 (modular board) OFF / OFF ON — MSEL 1 Low, OFF — MSEL 1 High, Note: If you want to control the configuration over BTS, set this switch to OFF state S13.1 (carrier board) ON ON — PCIe edge clock, OFF — Clock from onboard Si52202 Every other switch should be in its default position, as per the Agilex 5 FPGA E-Series 065B Modular Development Kit User Guide, section 3.1 Default Settings.
-
Connect the development kit to host machine via PCIe Gen3 (or higher) slot.
-
Connect the development kit to ATX power supply between it and the host.
3.0 Software Requirements
- RHEL 9.4 (Supports OFS 2025.1 and FPGA AI Suite 2025.1.1)
- Can also use RHEL 8.10 if preferred
- A valid Quartus Prime Pro 25.1 installation
- If just programming the card, only the Quartus Programmer is required
- Install the OFS (Open FPGA Stack) SDK and relevant DFL drivers
4.0 How to Program the FIM
- Download the OFS 2025.1 FIM from https://github.com/OFS/ofs-agx5-pcie-attach/releases/download/ofs-2025.1-1/eseries-mdk-images_ofs-2025-1-1.tar.gz.
-
If you haven't already, add the Quartus Programmer binaries to PATH.
bash session export PATH="$PATH:"/<quartus_install_path>/intelFPGA_pro/25.1/qprogrammer/quartus/bin -
List FPGA connected via JTAG.
bash session
  jtagconfig -D
-
Program the FIM onto FPGA. (Note the device_number from
jtagconfig).bash session quartus_pgm -c 1 -m jtag -o "p;/<path_to_image>/eseries-mdk-images_ofs-2025-1-1/ofs_top.sof@1" -
Warm reboot the server.
bash session sudo reboot -
After programming FIM and reboot, the host machine should be able to detect the new FPGA via its PCIe connection.
bash session
  lspci | grep acc
In this case, the PCI-address of AGX5E Modular Development Kit is 5e:00.0
Created: August 25, 2025