HPS GSRD User Guide
Overview
The HPS Baseline System Example Design (formerly known as "GSRD" or "Golden System Reference Design") demonstrates basic HPS functionality on the Agilex™ 7 FPGA F-Series Development Kit (2x F-Tile)
The design is comprised of the following components:
- Quartus Design
- HPS Software
- Arm Trusted Firmware
- U-Boot
- Linux Kernel
- Linux Drivers
- Sample Applications
Note: There was older version of this board, with ordering code DK-DEV-AGF027F1ES is deprecated, and not supported anymore.
Prerequisites
The following are required in order to be able to fully exercise the System Example Design:
- Agilex™ 7 FPGA F-Series Development Kit (2x F-Tile) ordering code DK-DEV-AGF023FA
- SD/MMC HPS Daughtercard
- Mini USB cable for serial output
- Micro USB cable for on-board Altera® FPGA Download Cable II
- Micro SD card (4GB or greater)
- Host PC with
- Linux - Ubuntu 22.04LTS was used to create this page, other versions and distributions may work too
- Serial terminal (for example Minicom on Linux and TeraTerm or PuTTY on Windows)
- Micro SD card slot or Micro SD card writer/reader
- Altera® Quartus® Prime Pro Edition Version 26.3
- Local Ethernet network, with DHCP server (will be used to provide IP address to the board)
The U-Boot and Linux compilation, Yocto compilation and creating the SD card image require a Linux host PC. The rest of the operations can be performed on either a Windows or Linux host PC.
Release Notes
The Altera® FPGA HPS Embedded Software release notes can be accessed from the following link: https://github.com/altera-fpga/gsrd-socfpga/releases/tag/QPDS26.3_REL_BASELINE_PR
Prebuilt Binaries
The prebuilt binaries are located at https://releases.rocketboards.org/2026.10/gsrd/agilex7_dk_dev_agf023fa_gsrd/
The source code is also included on the SD card in the Linux rootfs path /home/root:
| File | Description |
|---|---|
| linux-socfpga-v6.18.37-lts-src.tar.gz | Source code for Linux kernel |
| u-boot-socfpga-v2026.07-src.tar.gz | Source code for U-Boot |
| arm-trusted-firmware-v2.15.0-src.tar.gz | Source code for Arm Trusted Firmware |
Component Versions
Altera® Quartus® Prime Pro Edition Version 26.3 and the following software component versions integrate the 26.3 release.
| Component | Location | Branch | Commit ID/Tag |
|---|---|---|---|
| HPS Baseline System Example Design | https://github.com/altera-fpga/agilex7-ed-hps-baseline | main | QPDS26.3_REL_BASELINE_PR |
| Linux | https://github.com/altera-fpga/linux-socfpga | socfpga-6.18.37-lts | QPDS26.3_REL_BASELINE_PR |
| Arm Trusted Firmware | https://github.com/altera-fpga/arm-trusted-firmware | socfpga_v2.15.0 | QPDS26.3_REL_BASELINE_PR |
| U-Boot | https://github.com/altera-fpga/u-boot-socfpga | socfpga_v2026.07 | QPDS26.3_REL_BASELINE_PR |
| Yocto Project | https://git.yoctoproject.org/poky | wrynose | latest |
| Yocto meta-altera-fpga Layer | https://github.com/altera-fpga/meta-altera-fpga | wrynose | QPDS26.3_REL_BASELINE_PR |
| KAS | https://github.com/siemens/kas/ | master | 5.4 |
Note: The combination of the component versions indicated in the table above has been validated through the use cases described in this page and it is strongly recommended to use these versions together. If you decided to use any component with different version than the indicated, there is not warranty that this will work.
Note: Starting from 26.3 Quartus release, the build of the Quartus projects in the System Example Designs are based only on Visual Designer Studio (VDS).
Please review the following KDB if you face Quartus design build problems when the RTL was generated with VDS:
Why do Quartus® Prime Pro 26.3 and earlier fail to build a Agilex® 5/Agilex® 3/Agilex® 7 FPGA M-Series VDS based design whose RTL has been generated with VDS?.
Exercise Prebuilt Binaries
Boot Linux
Configure Board
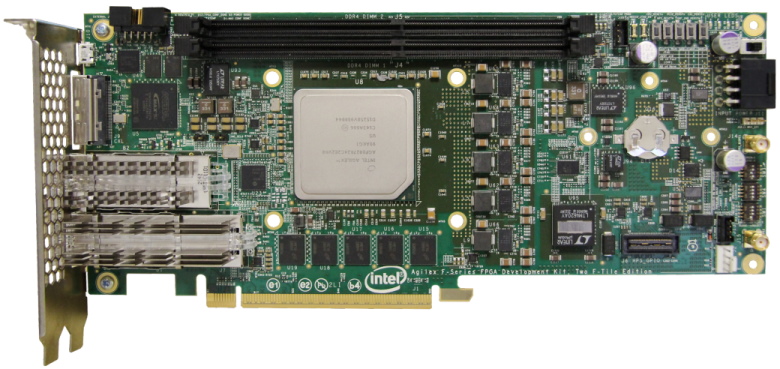
Set up the board switches:
| Switch | Setting |
|---|---|
| SW1[1:4] | ON/OFF/OFF/OFF |
| SW2 | ON |
| SW3[1:4] | OFF/OFF/ON/OFF |
| SW4[1:4] | OFF/OFF/OFF/OFF |
| SW5 | OFF |
| SW6 | OFF |
For more details about the settings, consult the Altera® Agilex™ 7 F-Series FPGA (Two F-Tiles) Development Kit User Guide.
Write QSPI Image
1. Download and extract the jic file:
cd $TOP_FOLDER
wget https://releases.rocketboards.org/2026.10/gsrd/agilex7_dk_dev_agf023fa_gsrd/ghrd.hps.jic
2. Power up the board
3. Write the JIC file
Write SD Card
This section explains how to create the SD card necessary to boot Linux, using the SD card image available with the pre-built Linux binaries package. Once the SD card has been created, insert the card into the SD slot of the Micro SD daughter card.
Write SD Card on Linux
1. Download the SD card image and extract it:
wget https://releases.rocketboards.org/2026.10/gsrd/agilex7_dk_dev_agf023fa_gsrd/sdimage.tar.gz
tar xf sdimage.tar.gz
The extacted file is named gsrd-console-image-agilex7.rootfs.wic.
2. Determine the device associated with the SD card on the host by running the following command before and after inserting the card.
Let's assume it is /dev/sdx.
3. Use dd utility to write the SD image to the SD card.
Note we are using sudo to be able to write to the card.
4. Use sync utility to flush the changes to the SD card.
Write SD Card on Windows
1. Download the SD card from https://releases.rocketboards.org/2026.10/gsrd/agilex7_dk_dev_agf023fa_gsrd/sdimage.tar.gz and extract it.
The extacted file is named gsrd-console-image-agilex7.rootfs.wic.
2. Rename the wic file as sdcard.img
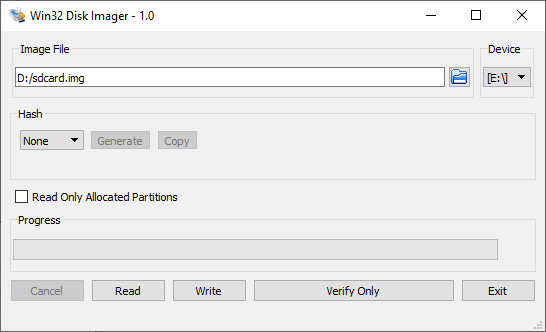
3. Use Win32DiskImager to write the image to the SD card. The tool can be downloaded from https://sourceforge.net/projects/win32diskimager/files/latest/download
Configure Serial Connection
The OOBE Daughter Card has a built-in FTDI USB to Serial converter chip that allows the host computer to see the board as a virtual serial port. Ubuntu and other modern Linux distributions have built-in drivers for the FTDI USB to Serial converter chip, so no driver installation is necessary on those platforms. Microsoft Windows 10 and 11 automatically install the necessary drivers.
The serial communication parameters are:
- Baud-rate: 115,200
- Parity: none
- Flow control: none
- Stop bits: 1
On Windows, utilities such as TeraTerm and PuTTY can be used to connect to the board. They are easily configured from the tool menus.
On Linux, the minicom utility can be used. Here is how to configure it:
1. The virtual serial port is usually named /dev/ttyUSB0. In order to determine the device name associated with the virtual serial port on your host PC, please perform the following:
- Use the following command to determine which USB serial devices are already installed: ls /dev/ttyUSB*
- Connect mini USB cable from J7 to the PC. This will enable the PC to communicate with the board, even if the board is not powered yet.
- Use the ls /dev/ttyUSB* command command again to determine which new USB serial device appeared.
- Install minicom application on host PC, if not installed.
- On Ubuntu, use sudo apt-get install minicom
- Configure minicom.
Under Serial Port Setup choose the following:
- Serial Device: /dev/ttyUSB0 (edit to match the system as necessary)
- Bps/Par/Bits: 115200 8N1
- Hardware Flow Control: No
- Software Flow Control: No
- Hit [ESC] to return to the main configuration menu
Select Save Setup as dfl to save the default setup. Then select Exit.
Boot Linux
1. Make sure to have the SD card inserted in the board slot.
2. Start serial terminal (when using Minicom it will connect using the selected settings, for others connect manually).
3. Set MSEL to ASx4/QSPI
4. Power up the board
5. The device will be configurd, HPS will be loaded with the U-Boot SPL, which will then load ATF and U-Boot proper, then Linux will be booted.
6. Login using 'root' and no password.
7. Run 'ifconfig' command to determine the IP of the board:
root@agilex7dkdevagf023fa:~/alteraFPGA# ifconfig
eth0: flags=4163 mtu 1500
 inet 192.168.1.161 netmask 255.255.255.0 broadcast 192.168.1.255
 inet6 fe80::7cac:dff:fe64:88d9 prefixlen 64 scopeid 0x20
 ether 7e:ac:0d:64:88:d9 txqueuelen 1000 (Ethernet)
 RX packets 183 bytes 32164 (31.4 KiB)
 RX errors 0 dropped 0 overruns 0 frame 0
 TX packets 69 bytes 8864 (8.6 KiB)
 TX errors 0 dropped 0 overruns 0 carrier 0 collisions 0
 device interrupt 21 base 0x2000

lo: flags=73 mtu 65536
 inet 127.0.0.1 netmask 255.0.0.0
 inet6 ::1 prefixlen 128 scopeid 0x10
 loop txqueuelen 1000 (Local Loopback)
 RX packets 100 bytes 8468 (8.2 KiB)
 RX errors 0 dropped 0 overruns 0 frame 0
 TX packets 100 bytes 8468 (8.2 KiB)
 TX errors 0 dropped 0 overruns 0 carrier 0 collisions 0
Run Sample Applications
Prerequisites
1. Boot Linux on the board
2. Connect to the board serial port.
3. In serial console, or ssh client console, change current folder to be /home/root/alteraFPGA. This is where the application binaries are stored.
Display Hello World Message
Run the following command to display the Hello World message on the console:
Exercise Soft PIO Driver for LED Control
The following green LEDs are exercised:
- USER LED0
- USER LED1
- USER LED2
Note: USER LED3 is always blinking, and cannot be controlled from software.
1. In order to blink an LED in a loop, with a specific delay in ms, run the following command:
- The led_number specifies the desired LED, and is a value between 0 and 3.
- The delay_ms is a number that specifies the desired delay in ms between turning the LED on and off.
2. In order to turn an individual LED on or off, run the following command:
- The led_number specifies the desired LED, and is a value between 0 and 3.
- The state needs to be 0 to turn the LED off, and 1 to turn the LED on.
3. In order to scroll the FPGA LEDs with a specific delay, please run the following command:
The delay specifies the desired scrolling behavior:
- delay > 0 - specify new scrolling delay in ms, and start scrolling
- delay < 0 - stop scrolling
- delay = 0 - display current scroll delay
System Check Application
System check application provides a glance of system status of basic peripherals such as:
- USB: USB device driver
- Network IP (IPv4): Network IP address
- HPS LEDs: HPS LED state
- FPGA LEDs: FPGA LED state
Run the application by issuing the following command:
The window will look as shown below - press 'q' to exit:
 ALTERA SYSTEM CHECK

lo : 127.0.0.1 usb1 : DWC OTG Controller
eth0 : 192.168.1.161
 serial@ffc02100 : disabled
fpga_led2 : OFF serial@ffc02000 : okay
hps_led2 : OFF
fpga_led0 : ON
hps_led0 : OFF
fpga_led3 : ON
fpga_led1 : OFF
hps_led1 : OFF
Connect to Board Web Server and SSH Client
Connect to Web Server
1. Boot Linux
2. Determine the IP address of the board using 'ifconfig' as shown above. Note there will be network interfaces of them, either can be used.
3. Open a web browser on the host PC and type http:// on the address box, then type the IP of your board and hit Enter.
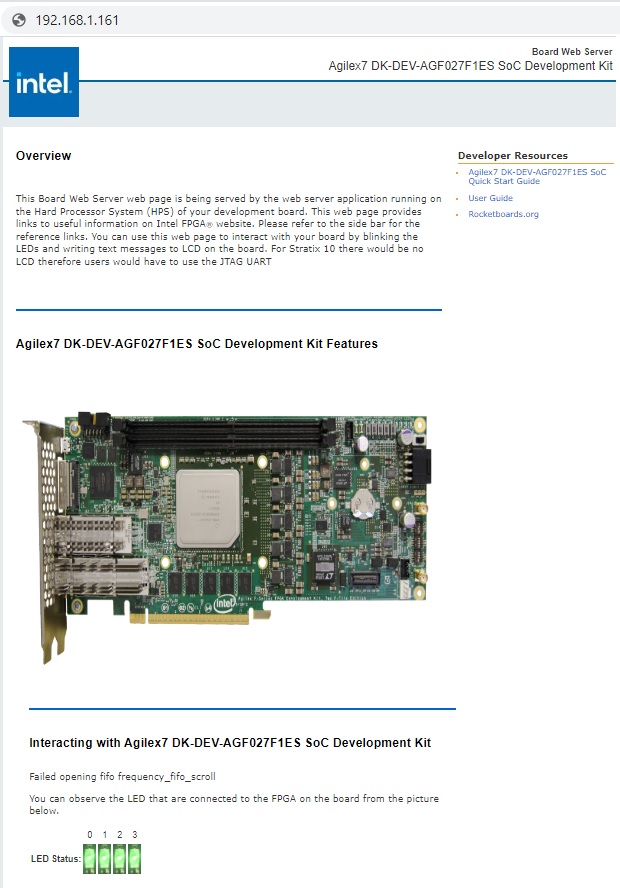
4. In the section named Interacting with Agilex SoC Development Kit you can perform the following actions:
- See which LEDs are ON and which are off in the LED Status. Note that if the LEDs are setup to be scrolling, the displayed scrolling speed will not match the actual scrolling speed on the board.
- Stop LEDs from scrolling, by clicking START and STOP buttons. The delay between LEDs turning ON and OFF is set in the LED Lightshow box.
- Turn individual LEDs ON and OFF with the ON and OFF buttons. Note that this action is only available when the LED scrolling/lightshow is stopped.
- Blink individual LEDs by typing a delay value in ms then clicking the corresponding BLINK button. Note that this action is only available when the LED scrolling/lightshow is stopped.
Connect Using SSH
1. The lower bottom of the web page presents instructions on how to connect to the board using an SSH connection.
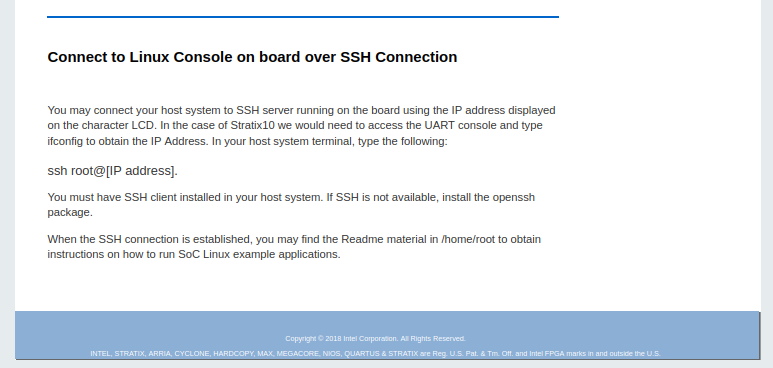
2. If the SSH client is not installed on your host computer, you can install it by running the following command on CentOS:
or the following command on Ubuntu:
3. Connect to the board, and run some commands, such as pwd, ls and uname to see Linux in action:
Rebuild the System Example Design
The embedded software for this System Example Design is built with Yocto, using KAS.
Kas is a Python-based lightweight build orchestration layer on top of BitBake/Yocto. Kas allows you to define your build environment in a YAML manifest, so you can perform checkout, environment setup, configuration, and build invocation with a single command. Kas provides a more maintainable build description, it offers improved reproducibility, reduced setup friction, and a clearer abstraction for managing multiple layers, revisions, and configuration fragments.
The software source code for this System Example Design is released inside the software/yocto_linux directory. Accessing the link will display a README page with details regarding the software.
For more details about Kas, refer to the official documentation at https://kas.readthedocs.io/en/latest/.
Kas Build Prerequisites
Firtst, the same prerequisites as for regular Yocto build are required.
1. Make sure you have Yocto system requirements met: https://docs.yoctoproject.org/scarthgap/ref-manual/system-requirements.html#supported-linux-distributions.
The command to install the required packages on Ubuntu 22.04 is:
sudo apt-get update
sudo apt-get upgrade
sudo apt-get install openssh-server mc libgmp3-dev libmpc-dev gawk wget git diffstat unzip texinfo gcc \
build-essential chrpath socat cpio python3 python3-pip python3-pexpect xz-utils debianutils iputils-ping \
python3-git python3-jinja2 libegl1-mesa libsdl1.2-dev pylint xterm python3-subunit mesa-common-dev zstd \
liblz4-tool git fakeroot build-essential ncurses-dev xz-utils libssl-dev bc flex libelf-dev bison xinetd \
tftpd tftp nfs-kernel-server libncurses5 libc6-i386 libstdc++6:i386 libgcc++1:i386 lib32z1 \
device-tree-compiler curl mtd-utils u-boot-tools net-tools swig -y
On Ubuntu 22.04 you will also need to point the /bin/sh to /bin/bash, as the default is a link to /bin/dash:
Note: You can also use a Docker container to build the Yocto recipes, refer to https://rocketboards.org/foswiki/Documentation/DockerYoctoBuild for details. When using a Docker container, it does not matter what Linux distribution or packages you have installed on your host, as all dependencies are provided by the Docker container.
In addition to the above, you must also install python3-newt, and python3.10-venv with a command like this:
Build Flow
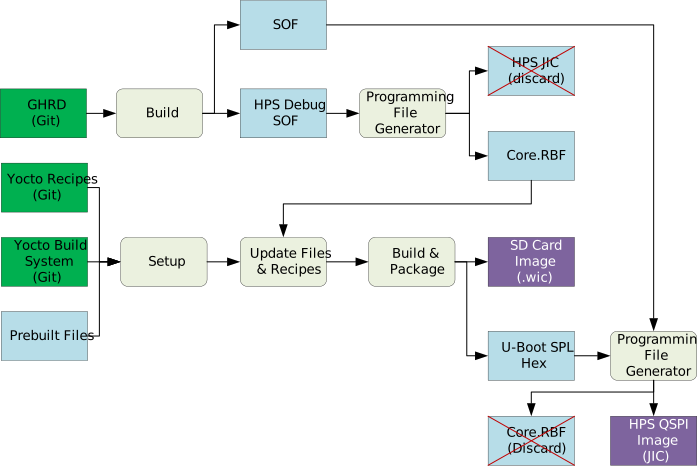
The following diagram illustrates the full build flow based on source code from GitHub.
Set up Environment
Create a top folder for this example, as the rest of the commands assume this location:
sudo rm -rf agilex7f_fpga.baseline
mkdir agilex7f_fpga.baseline
cd agilex7f_fpga.baseline
export TOP_FOLDER=$(pwd)
Enable Quartus tools to be called from command line:
Build Quartus Design
Use the following commands to build the Quartus Design:
cd $TOP_FOLDER
rm -rf dk-dev-agf023fa-oobe-baseline
mkdir dk-dev-agf023fa-oobe-baseline
cd dk-dev-agf023fa-oobe-baseline
wget https://github.com/altera-fpga/agilex7-ed-hps-baseline/releases/download/QPDS26.3_REL_BASELINE_PR/dk-dev-agf023fa-oobe-baseline.zip
unzip dk-dev-agf023fa-oobe-baseline.zip
rm -f dk-dev-agf023fa-oobe-baseline.zip
make baseline-install
The following files are created:
$TOP_FOLDER/dk-dev-agf023fa-oobe-baseline/install/binaries/baseline.sof- FPGA configuration file, without HPS FSBL$TOP_FOLDER/dk-dev-agf023fa-oobe-baseline/install/binaries/ghrd.core.rbf- FPGA fabric configuration file
Build Yocto Using Kas
1. Create and enter a new Python virtual environment:
cd $TOP_FOLDER/dk-dev-agf023fa-oobe-baseline/software/yocto_linux
python3 -m venv venv --system-site-packages
source venv/bin/activate
pip install --upgrade pip
pip install kas
pip install --upgrade kas
pip install kconfiglib
2. Copy the core.rbf file to where Kas expects it to be:
cp $TOP_FOLDER/dk-dev-agf023fa-oobe-baseline/install/binaries/ghrd.core.rbf meta-custom/recipes-fpga/fpga-bitstream/files/baseline_hps_debug.core.rbf
3. Build Yocto with Kas:
The following relevant files are created in $TOP_FOLDER/dk-dev-agf023fa-oobe-baseline/software/yocto_linux/build/tmp/deploy/images/agilex7/:
gsrd-console-image-agilex7.rootfs.wicu-boot-spl-dtb.hex
Note: If you experience build failures related to file-locks, you can work around these by reducing the parallelism of your build by running the following commands before running
kas:
export PARALLEL_MAKE="-j 8"
export BB_NUMBER_THREADS="8"
export BB_ENV_PASSTHROUGH_ADDITIONS="$BB_ENV_PASSTHROUGH_ADDITIONS PARALLEL_MAKE BB_NUMBER_THREADS"
Create JIC File
The bootable JIC image will contain the FPGA configuration data and the HPS FSBL and it can be built using the following command:
cd $TOP_FOLDER
rm -f *jic* *rbf*
quartus_pfg -c $TOP_FOLDER/dk-dev-agf023fa-oobe-baseline/install/binaries/baseline.sof \
 ghrd.jic \
 -o hps_path=$TOP_FOLDER/dk-dev-agf023fa-oobe-baseline/software/yocto_linux/build/tmp/deploy/images/agilex7/u-boot-spl-dtb.hex \
 -o device=MT25QU02G \
 -o flash_loader=AGFD023R24C2E1VC \
 -o mode=ASX4 \
 -o hps=1
The following files will be created:
$TOP_FOLDER/ghrd.hps.jic- JIC file to configure the device for HPS first, phase 1
How to Manually Update the kernel.itb file
The kernel.itb file is a Flattattened Image Tree (FIT) file that includes the following components:
- Linux kernel.
- Board configurations* that indicate what components from the kernel.itb (Linux kernel, device tree and Phase 2 FPGA configuration bitstream) should be used for a specific board.
- Linux device tree*.
- Phase 2 FPGA configuration bitstream*.
* One or more of these components to support the different board configurations.
The kernel.itb is created from a .its (Image Tree Source file) that describes its structure. In the HPS Baseline System Example Design, the kernel.itb file is generated in the following directory. In this directory you can also find the .its files and all other the components needed to create the kernel.itb :
- $TOP_FOLDER/<gsrd-directory>/<project-directory>/software/yocto_linux/build/tmp*/work/<device>-poky-linux/linux-socfpga-lts/<linux-branch>+git/linux-<device>-standard-build/
As an example of this path, for the Agilex 5 device you will find this directory as $TOP_FOLDER/a5ed065es-premium-devkit-oobe/baseline-a55/software/yocto_linux/build/tmp*/work/agilex5e-poky-linux/linux-socfpga-lts/6.12.43-lts+git/linux-agilex5e-standard-build
If you want to modify the kernel.itb by replacing one of the component or modifying any board configuration, you can do the following:
-
Install mtools package in your Linux machine.
-
Go to the folder in which the kernel.itb is being created under the HPS Baseline System Example Design.
-
In the .its file, observe the components that integrates the kernel.itb identifying the nodes as indicated next:
images node:
- kernel node - Linux kernel defined with the data parameter in the node.
- fdt-X node - Device tree X defined with the data parameter in the node.
- fpga-X node - Phase 2 FPGA configuration bitstream .rbf defined with the data parameter in the node.configurations node:
- board-X node - Board configuration with the name defined with the description parameter. The components for a specific board configuration are defined with the kernel, fdt and fpga parameters. -
In this directory, you can replace any of the file components that integrate the kernel.itb, or you can also modify the .its to change the structure and components of the kernel.itb.
-
Finally, you need to re-generate the new kernel.itb running the following command in the same linux-
-standard-build/ directory.
Once that you have completed this procedure, you can use the new kernel.itb as needed. Some options could be:
- Use U-Boot to load this into the SDRAM board through TFTP to boot Linux or to write it to a flash device
- Directly update the flash image in your board (QSPI, SD Card, eMMC or NAND) from your working machine.
How to Manually Update the SD Card Content file
As part of the Yocto HPS Baseline System Example Designbuild flow, the SD Card image is built for the SD Card boot flow. This image includes a couple of partitions. One of these partition (a FAT32) includes the U-Boot proper, the Distroboot boot script, U-Boot environment and the Linux .itb - which includes the Linux kernel image, the Linux device tree, the phase 2 FPGA configuration bitstream and board configuration (there may be several versions of these last 3 components). The 2nd partition (an EXT3 or EXT4 ) includes the Linux file system.
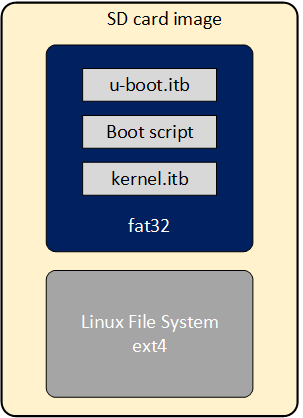
If you want to replace any the components or add a new item in any of these partitions, without having to run again the Yocto build flow.
This can be done through the wic script available on the Poky repository that is included as part of the HPS Baseline System Example Design build directory:
- $TOP_FOLDER/<gsrd-directory>/<project-directory>/software/yocto_linux/poky/scripts/wic
The wic command requires to be run in the Yocto build environment that can be setup as shown next in a Linux terminal:
cd $TOP_FOLDER/<gsrd-directory>/<project-directory>/software/yocto_linux/
source poky/oe-init-build-env build
The wic command allows you to inspect the content of a SD Card image, delete, add or replace any component inside of the image. This command is also provided with help support:
$ $TOP_FOLDER/<gsrd-directory>/<project-directory>/software/yocto_linux/poky/scripts/wic help

Creates a customized OpenEmbedded image.

Usage:  wic [--version]
        wic help [COMMAND or TOPIC]
        wic COMMAND [ARGS]

    usage 1: Returns the current version of Wic
    usage 2: Returns detailed help for a COMMAND or TOPIC
    usage 3: Executes COMMAND

COMMAND:

 list   -   List available canned images and source plugins
 ls     -   List contents of partitioned image or partition
 rm     -   Remove files or directories from the vfat or ext* partitions
 help   -   Show help for a wic COMMAND or TOPIC
 write  -   Write an image to a device
 cp     -   Copy files and directories to the vfat or ext* partitions
 create -   Create a new OpenEmbedded image
 :
 :
The following steps show you how to replace the kernel.itb file inside of the fat32 partition in a .wic image.
-
The wic ls command allows you to inspect or navigate over the directory structure inside of the SD Card image. For example you can observe the partitions in the SD Card image in this way.
# Here you can inspect the content a wic image see the 2 partitions inside of the SD Card image $ $TOP_FOLDER/<gsrd-directory>/<project-directory>/software/yocto_linux/poky/scripts/wic ls my_image.wic Num Start End Size Fstype 1 1048576 525336575 524288000 fat32 2 525336576 2098200575 1572864000 ext4 # Here you can naviagate inside of the partition 1 $ $TOP_FOLDER/<gsrd-directory>/<project-directory>/software/yocto_linux/poky/scripts/wic ls my_image.wic:1 Volume in drive : is boot Volume Serial Number is 8F65-ACE9 Directory for ::/ BOOTSC~1 UIM 2739 2011-04-05 23:00 boot.scr.uimg kernel itb 12885831 2011-04-05 23:00 uboot env 8192 2011-04-05 23:00 u-boot itb 938816 2011-04-05 23:00 4 files 13 835 578 bytes 509 370 368 bytes free -
The wic rm command allows you to delete any of the components in the selected partition. For example, you can delete the kernel.itb image from the partition 1(fat32 partition).
-
The wic cp command allows you to copy any new item or file from your Linux machine to a specific partition and location inside of the SD Card image. For example, you can copy a new kernel.itb to the partition 1.
NOTE: The wic application also allows you to modify any image with compatible vfat and ext* type partitions which also covers images used for eMMC boot flow.
Notices & Disclaimers
Altera® Corporation technologies may require enabled hardware, software or service activation. No product or component can be absolutely secure. Performance varies by use, configuration and other factors. Your costs and results may vary. You may not use or facilitate the use of this document in connection with any infringement or other legal analysis concerning Altera or Intel products described herein. You agree to grant Altera Corporation a non-exclusive, royalty-free license to any patent claim thereafter drafted which includes subject matter disclosed herein. No license (express or implied, by estoppel or otherwise) to any intellectual property rights is granted by this document, with the sole exception that you may publish an unmodified copy. You may create software implementations based on this document and in compliance with the foregoing that are intended to execute on the Altera or Intel product(s) referenced in this document. No rights are granted to create modifications or derivatives of this document. The products described may contain design defects or errors known as errata which may cause the product to deviate from published specifications. Current characterized errata are available on request. Altera disclaims all express and implied warranties, including without limitation, the implied warranties of merchantability, fitness for a particular purpose, and non-infringement, as well as any warranty arising from course of performance, course of dealing, or usage in trade. You are responsible for safety of the overall system, including compliance with applicable safety-related requirements or standards. © Altera Corporation. Altera, the Altera logo, and other Altera marks are trademarks of Altera Corporation. Other names and brands may be claimed as the property of others.
OpenCL* and the OpenCL* logo are trademarks of Apple Inc. used by permission of the Khronos Group™.